Tutorial: XAMPP - Local https and multiple domains (vhosts) (Windows)
Tuesday, 3rd June 2025
Alrighty, so this took me a day to get working lol. I wanted to be able to visit my different local dev web projects using different local https domain names.
I also wanted to use my own folders for my projects, rather than XAMPP's htdocs folder. Turns out this actually makes a difference to what configuration you have to do.
You might want to do this if you're using cookies in your project. That's why I did it. Visiting your local site on https will make your project cookies act more like they would on a live https server (if not exactly the same).
So basically I wanted to get the following working:
- https://localhost —> C:/XAMPP/htdocs/
- https://site1.localhost —> C:/MyStuff/Site1/
- https://site2.localhost —> C:/MyStuff/Site2/
- https://site3.localhost —> C:/MyStuff/Site3/
Eventually I got it working. Here's how I did it. We're gonna go right to the beginning just to be absolutely sure we don't miss a step, so skip any you've already done.
Disclaimer: Before we begin, I have no idea of the security implications of any of this and I'm not an Apache expert. I just like programming PHP and SQL and always do what I have to do to get that working. I have been using XAMPP for years and so far my PC hasn't exploded. But I take no responsibility for any consequence of you following this tutorial.
Still here? Alright!
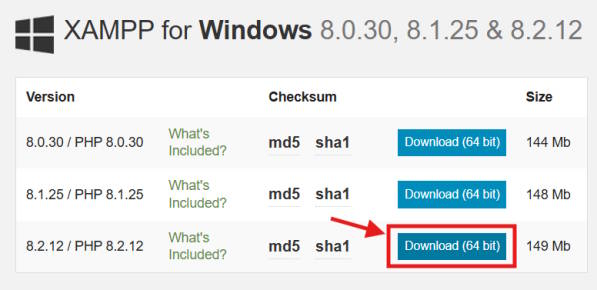
Step 1 – Install XAMPP if you haven't already
Visit: the XAMPP dowload page and click the button that's like the one in the following screenshot. Then install XAMPP, I think you can do that without step by step instructions. Although as a tip, you CAN untick all the stuff you don't need. For me the only stuff ticked was Apache, PHP, MySQL and PHPMyAdmin.
Once installed, start the control panel start Apache and just visit http://localhost (no s, for now) to make sure THAT is working.
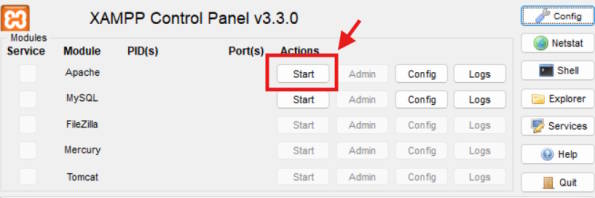

All good? Okay great, go back to the control panel and Stop Apache with the Stop button.
Step 2 – Edit Hosts File
First we'll get https://localhost working. Just for tidiness. We'll leave it pointing to the XAMPP Welcome page. After this we will get https://site1.localhost working (and using C:/MyStuff/Site1/. But for now this.
Open Notepad as an administrator by opening the start menu, going to Apps, right click on Notepad and choose Run as Administrator.
In Notepad, go File/Open and go to C:\Windows\System32\drivers\etc\. Make sure All Files (*.*) is selected in the dropdown menu. Open the file called “hosts”.
On a new line at the end, type the following and save:
127.0.0.1 localhost
Done. Close the hosts file and close Notepad.
Step 3 – Edit Apache VHosts (httpd-vhosts.conf)
Go to the XAMPP control panel. Click the Config button. Click
“Browse
All the stuff that starts with a # is commented out (example stuff). So, leave it as it is in case we mess up. Aright, go to the end and paste the following at the end of the file:
			NameVirtualHost *:443

			<VirtualHost *:443>
				DocumentRoot "C:\xampp\htdocs"
				ServerName localhost
				SSLEngine on
				SSLCertificateFile "conf/ssl.crt/server.crt"
				SSLCertificateKeyFile "conf/ssl.key/server.key"
				<Directory "C:\xampp\htdocs">
						AllowOverride All
					Order allow,deny
					Allow from all
					Require all granted
				</Directory>
			</VirtualHost>
Save. Close Notepad. Go back to the XAMPP control panel and Start Apache. Visit https://localhost. Your web browser will probs complain about a bad SSL certificate. We don't care, it's just for local dev. So hit Advanced/Continue anyway (or whatever your browser asks). And done! You're now looking at localhost as a https site! GREAT!
Next lets take a look at creating https://site1.localhost! I recommend following this guide exactly (with site1), and then once you've verified that's working you can repeat and adjust the steps for your own local domains.
Step 4 – Create Site1
Create folder C:/MyStuff/Site1
Inside folder, create index.php and paste in the following code:
			<?php

				echo "hi from site 1"

			>
Step 5 – Edit Hosts File (Again)
Run Notepad as an Administrator again, go File/Recent/hosts.
Add the following at the end, save.
127.0.01 site1.localhost
Step 6 – Edit Apache VHosts (httpd-vhosts.conf) (Again)
In Notepad, go File/Recent/httpd-vhosts.conf.
Add the following at the end, save.
			<VirtualHost *:443>
				DocumentRoot "C:\MyStuff\Site1"
				ServerName site1.localhost
				SSLEngine on
				SSLCertificateFile "conf/ssl.crt/server.crt"
				SSLCertificateKeyFile "conf/ssl.key/server.key"
				<Directory "C:\MyStuff\Site1">
						AllowOverride All
					Order allow,deny
					Allow from all
					Require all granted
				</Directory>
			</VirtualHost>
Notice that we've changed the DocumentRoot, ServerName and Directory lines to match site1's uh, stuff.
Save, close, go to XAMPP control panel, stop and start apache.
Visit https://site1.localhost.
And wallah! You very own https subdomain on localhost!
Step (Lucky) 7 AND BEYOND – Conclusion
Ok so you've got it working, now you can add as many domains as you like for local development by repeating steps 3 – 6 for your own local domains.
I hope this tutorial helped someone! And if you read it all, thanks :D!