The overall structure of each element on a web-page has three, built in parts: the padding, the border and the margin. The best way for me to show you this, is with a diagram.
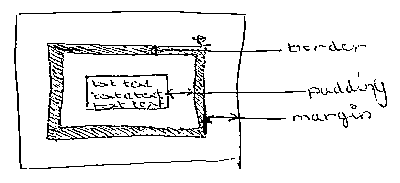
First you have the content of the element itself, represented here by the words "text text text". Next you have the padding of the element. Then, you have the border, and finally, you have the margin. The padding, border and margin can be as big or as small as you want them to be. You can also set the sizes of each individual side for each part. In this chapter I will show you how to set the padding of an element.
Setting the padding
Here's an example:
<p style="padding: 15px">text text text text</p>
Output
text text text text
Notice the extra spacing that is around the paragraph? This is because of the 15px padding that we have put in.
You can also set the padding for each individual side of the element like so:
<p style="padding: 10px 20px 30px 40px">text text text text</p>
Output
text text text text
The above has 10px padding at the top, the padding on the right is 20px, the padding at the bottom is 30px, and the padding on the left is 4px. This is the quickest way to do it. You can also set each side's padding seperately like so:
<p style="padding-top: 10px; padding-right: 20px; padding-bottom: 30px; padding-left: 40px;">text text text text</p>
Output
text text text text
You can set the padding whichever way you like. If I want to set a different padding for each side I personally prefer the first method because it is faster to type. The padding section is considered to be part of the background of the element, and so any background colour or image you set for the element will be applied to the padding as well as the content of the element itself.
Now, pad out your own elements using the tryout system, and then take the quiz on padding you make sure you've got it.